
Drip campaigns: building multi-step outreach in the flow builder

A quick campaign does one thing to a list of people. A drip campaign does a sequence of things, waits between them, and changes course based on how each person responds.

That difference is most of the value. Almost nobody replies to a first message. The follow-up three days later is what actually gets answered, and doing that by hand for 200 people is not something anyone sustains.

This guide replaces the old drip campaign post on this blog, which described a version of the product that no longer exists. Written against version 3.7.0.

The campaign list

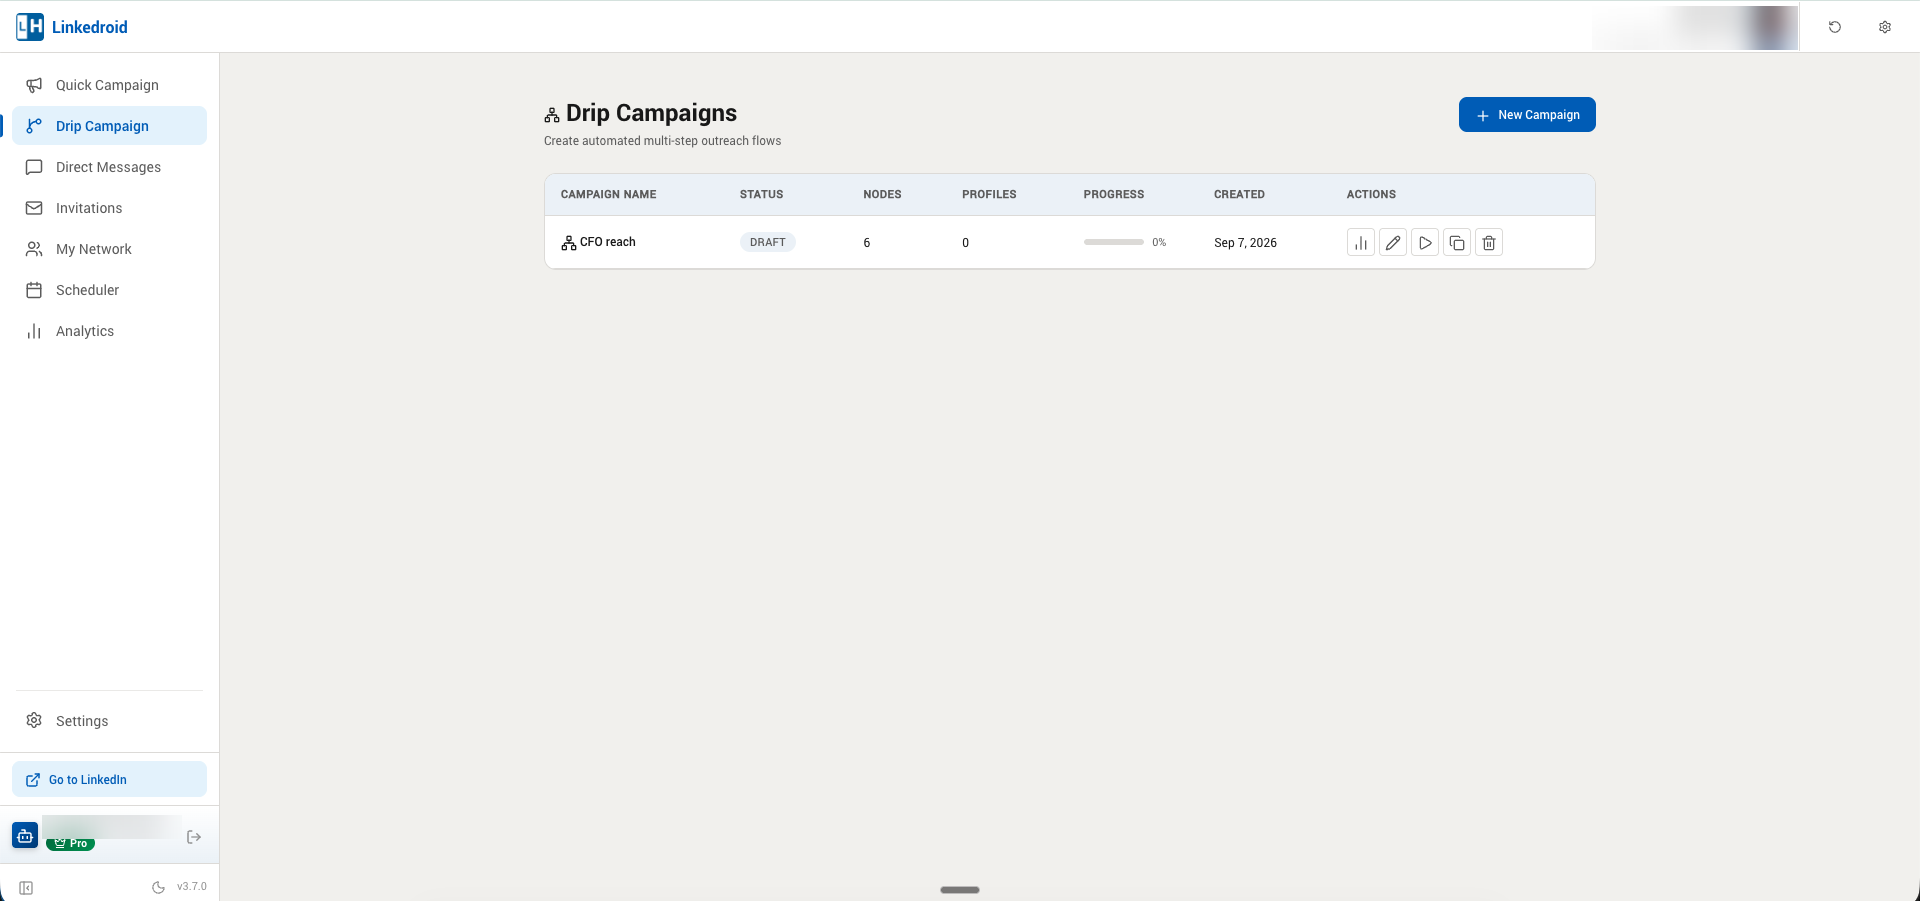
Drip Campaign in the sidebar opens your list. Each row shows the campaign name, status, how many nodes it contains, how many profiles are in it, progress, and when it was created.
The Drip Campaigns list
One draft campaign with 6 nodes and no profiles yet. The action buttons are analytics, edit, run, duplicate and delete.

Campaigns sit in DRAFT until you start them, so you can build a flow over several sittings without anything going out.

The duplicate button is more useful than it looks. Building a good sequence takes a few attempts, and duplicating a working one to try a variant beats editing the original and losing what worked.

Starting from a template

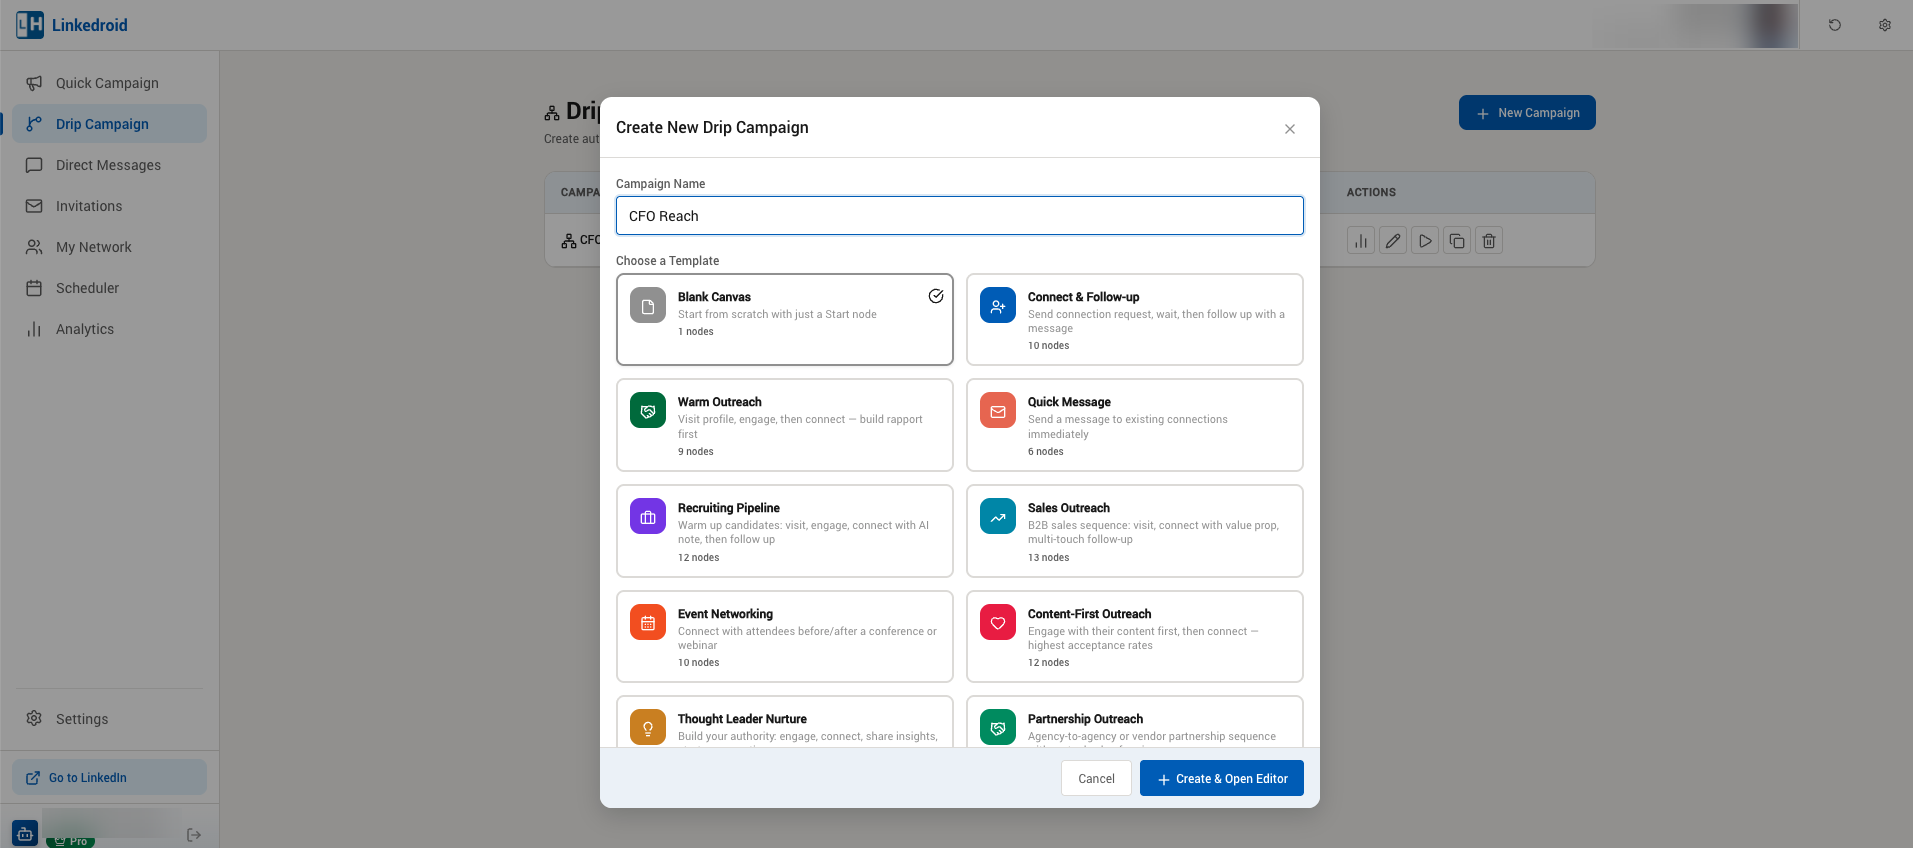
New Campaign asks for a name and a template. There are ten.
The drip campaign template picker
Ten starting points, from a blank canvas to a thirteen-node sales sequence.
  • Blank Canvas (1 node) starts with just a Start node.
  • Connect & Follow-up (10 nodes) sends a connection request, waits, then follows up with a message.
  • Warm Outreach (9 nodes) visits the profile and engages first, then connects. Builds rapport before asking.
  • Quick Message (6 nodes) messages existing connections immediately.
  • Recruiting Pipeline (12 nodes) warms up candidates: visit, engage, connect with an AI note, then follow up.
  • Sales Outreach (13 nodes) a B2B sequence with a value proposition and multi-touch follow-up.
  • Event Networking (10 nodes) for connecting with attendees before or after a conference.
  • Content-First Outreach (12 nodes) engages with their content first, then connects. The description claims the highest acceptance rates.
  • Thought Leader Nurture builds authority: engage, connect, share insights.
  • Partnership Outreach for agency-to-agency or vendor sequences.

Start from a template even if you plan to gut it. A thirteen-node sequence you cut down to five teaches you more about what the nodes do than a blank canvas does.

The canvas

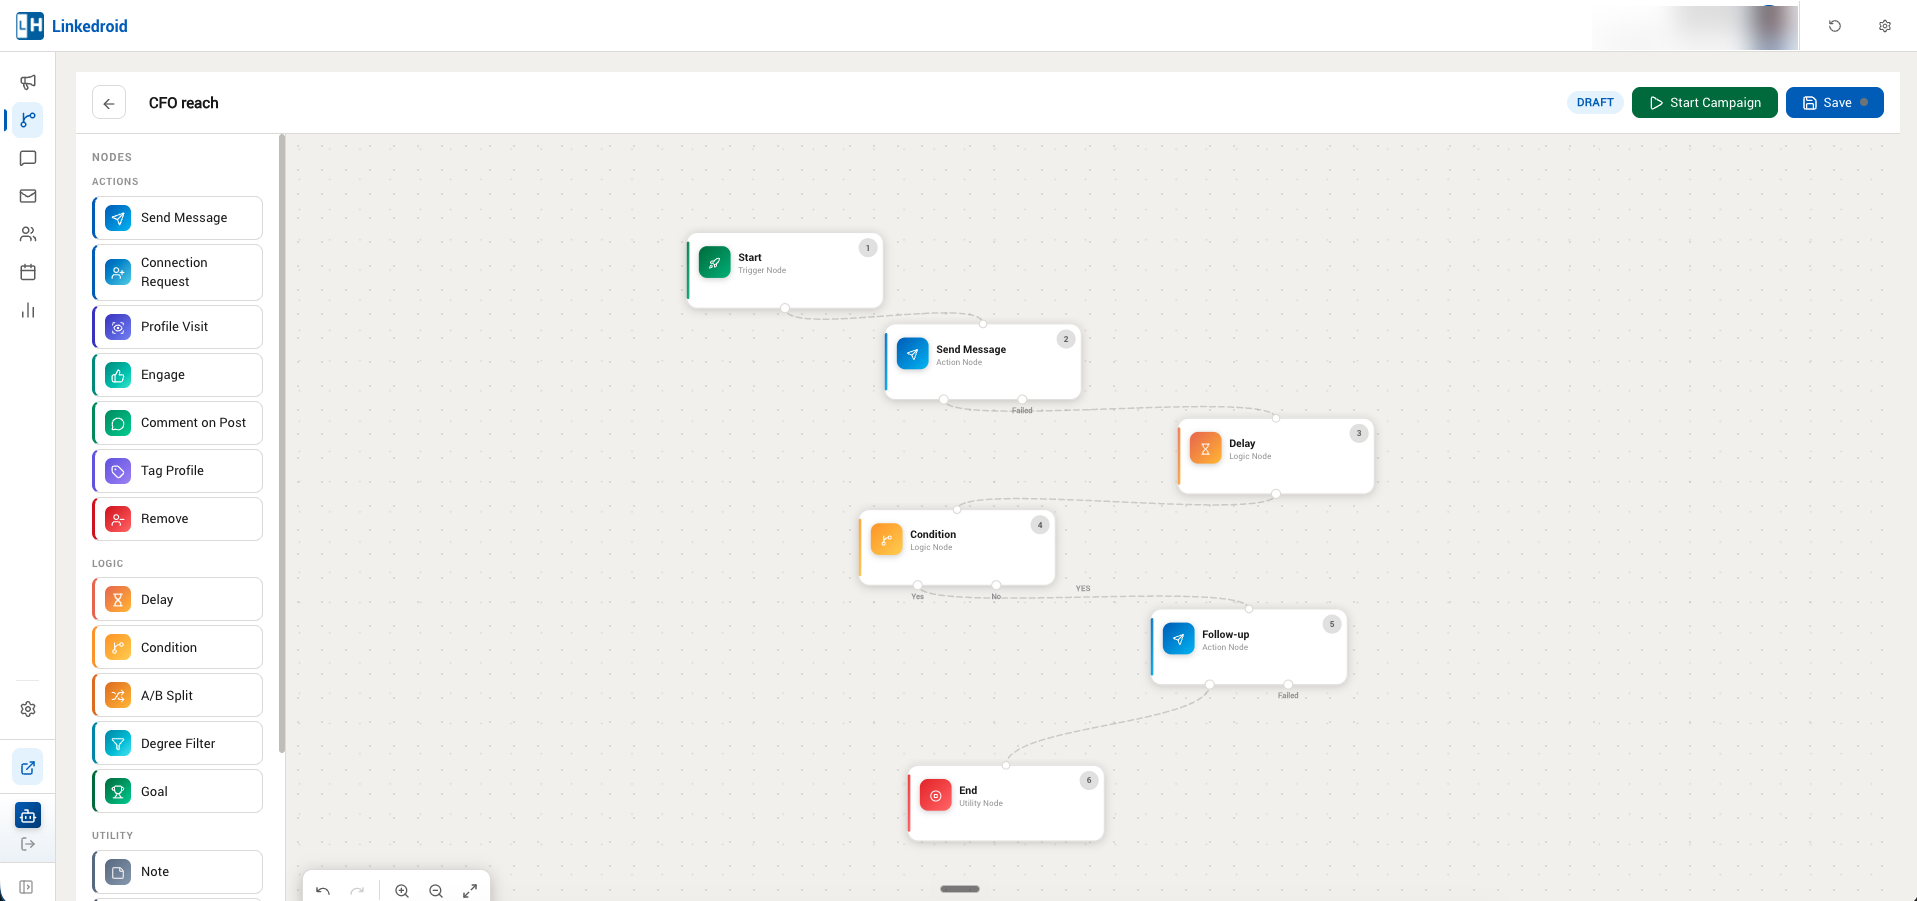
Create & Open Editor drops you into the flow builder: node palette on the left, canvas in the middle, config panel on the right when a node is selected.
The flow builder canvas with the node palette
A six-node flow: Start, Send Message, Delay, Condition, Follow-up, End. Nodes are numbered in execution order and branches are labelled.

The palette is grouped into four sections.

Actions

Things that happen on LinkedIn.

  • Send Message sends a direct message.
  • Connection Request sends an invite, with an optional note.
  • Profile Visit views the profile.
  • Engage likes their most recent post.
  • Comment on Post comments rather than just liking.
  • Tag Profile applies or removes a tag mid-flow.
  • Remove takes the profile out of the campaign.

Logic

Things that control the path.

  • Delay waits a set time before continuing.
  • Condition branches based on what the prospect did.
  • A/B Split divides the audience so you can test two messages.
  • Degree Filter routes by connection degree.
  • Goal marks a profile as having reached the outcome you wanted.

Utility

  • Note attaches an internal note to a profile.
  • Notification alerts you when a profile reaches that point.
  • End closes a branch cleanly.

Integration

Zapier Webhook and Webhook POST the profile's data to a URL you choose. You pick which fields go out: first and last name, public identifier, headline, profile URL, email and tags among them.

This is how a drip campaign feeds your CRM instead of living on its own island. Put a webhook on the Yes branch after a connection is accepted and every new connection lands in your pipeline without anyone copying anything.

Configuring the Send Message node

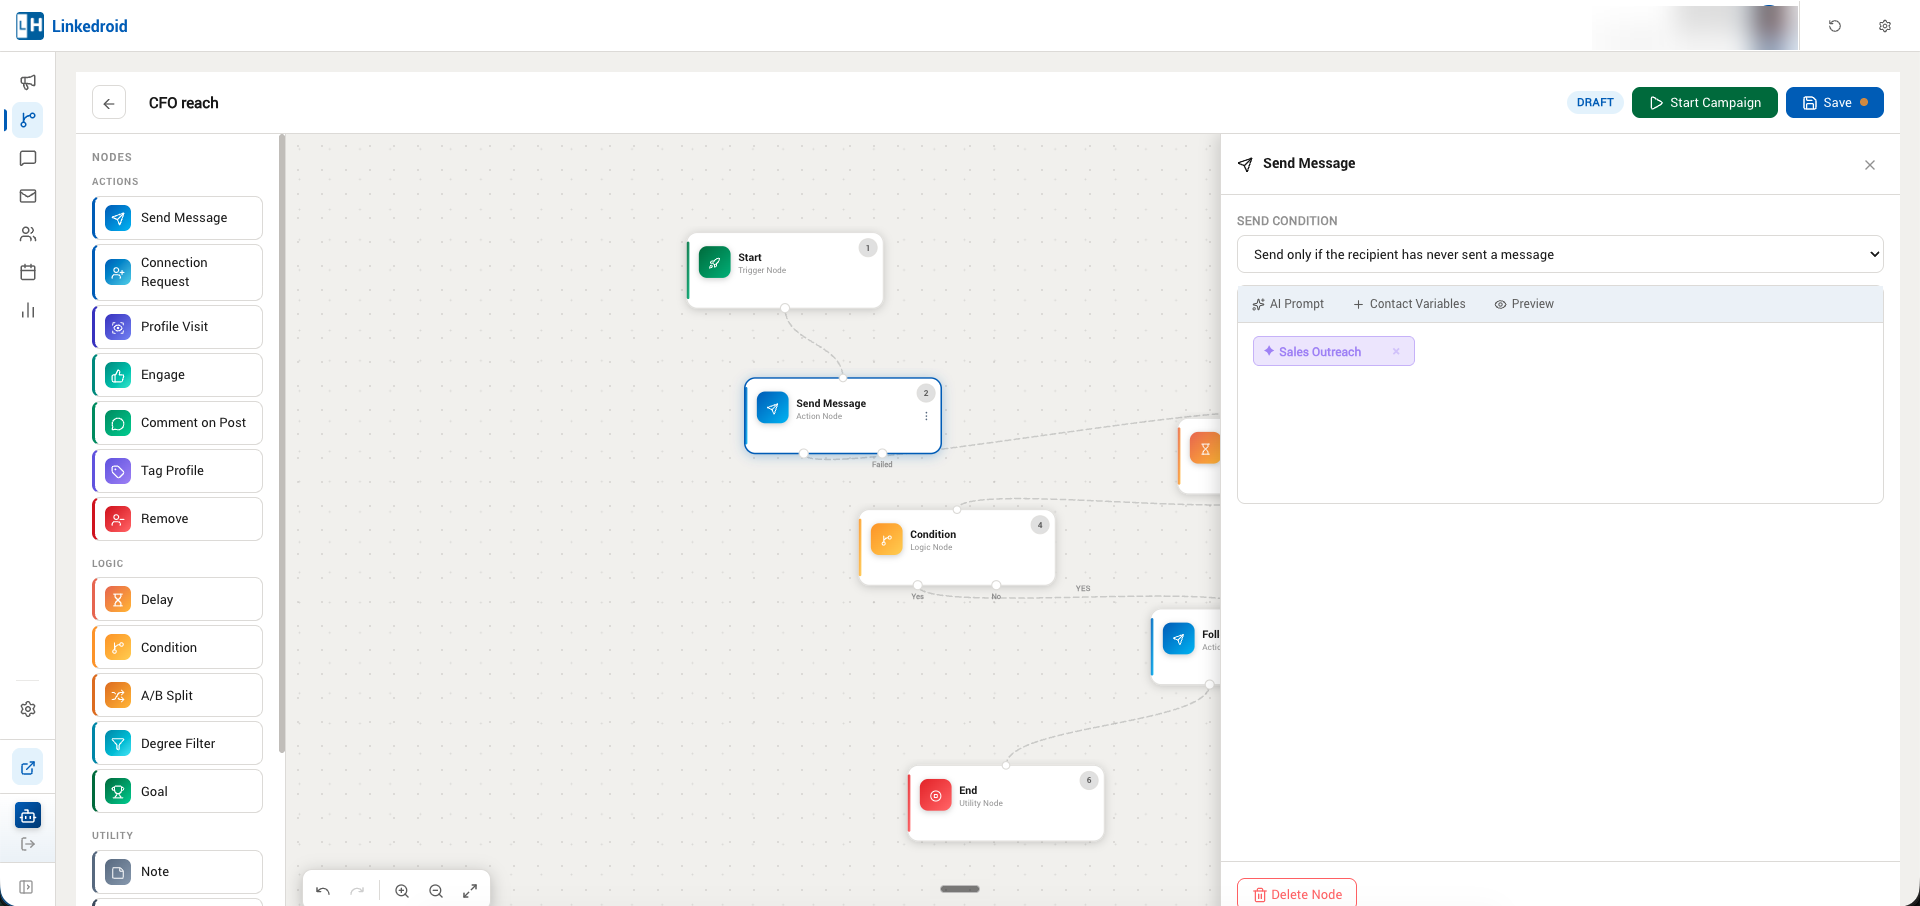
Click a node and the config panel opens on the right. Send Message is the one worth understanding properly.
The Send Message node configuration panel
Send Condition at the top, then the message composer with AI Prompt, Contact Variables and Preview tabs. The chip shows the active AI preset.

Send Condition

Three options, and picking the right one prevents the most embarrassing automation failure there is.

  • Always send. Sends regardless.
  • Send only if the recipient has never sent a message. Skips anyone who has already written to you.
  • Send only if no conversation exists. Skips anyone you have any thread with at all.

Use one of the last two on every follow-up node. "Always send" on a follow-up means someone replies to your first message, has a conversation with you, and then receives your scheduled follow-up as though you never read it. People notice, and it undoes whatever the first message earned.

The message composer

Three tabs. AI Prompt uses the same preset and prompt system covered in the AI personalization guide, so a drip message can be generated per profile rather than templated. Contact Variables inserts fields like first name into a fixed message. Preview renders the message against a real profile from your audience.
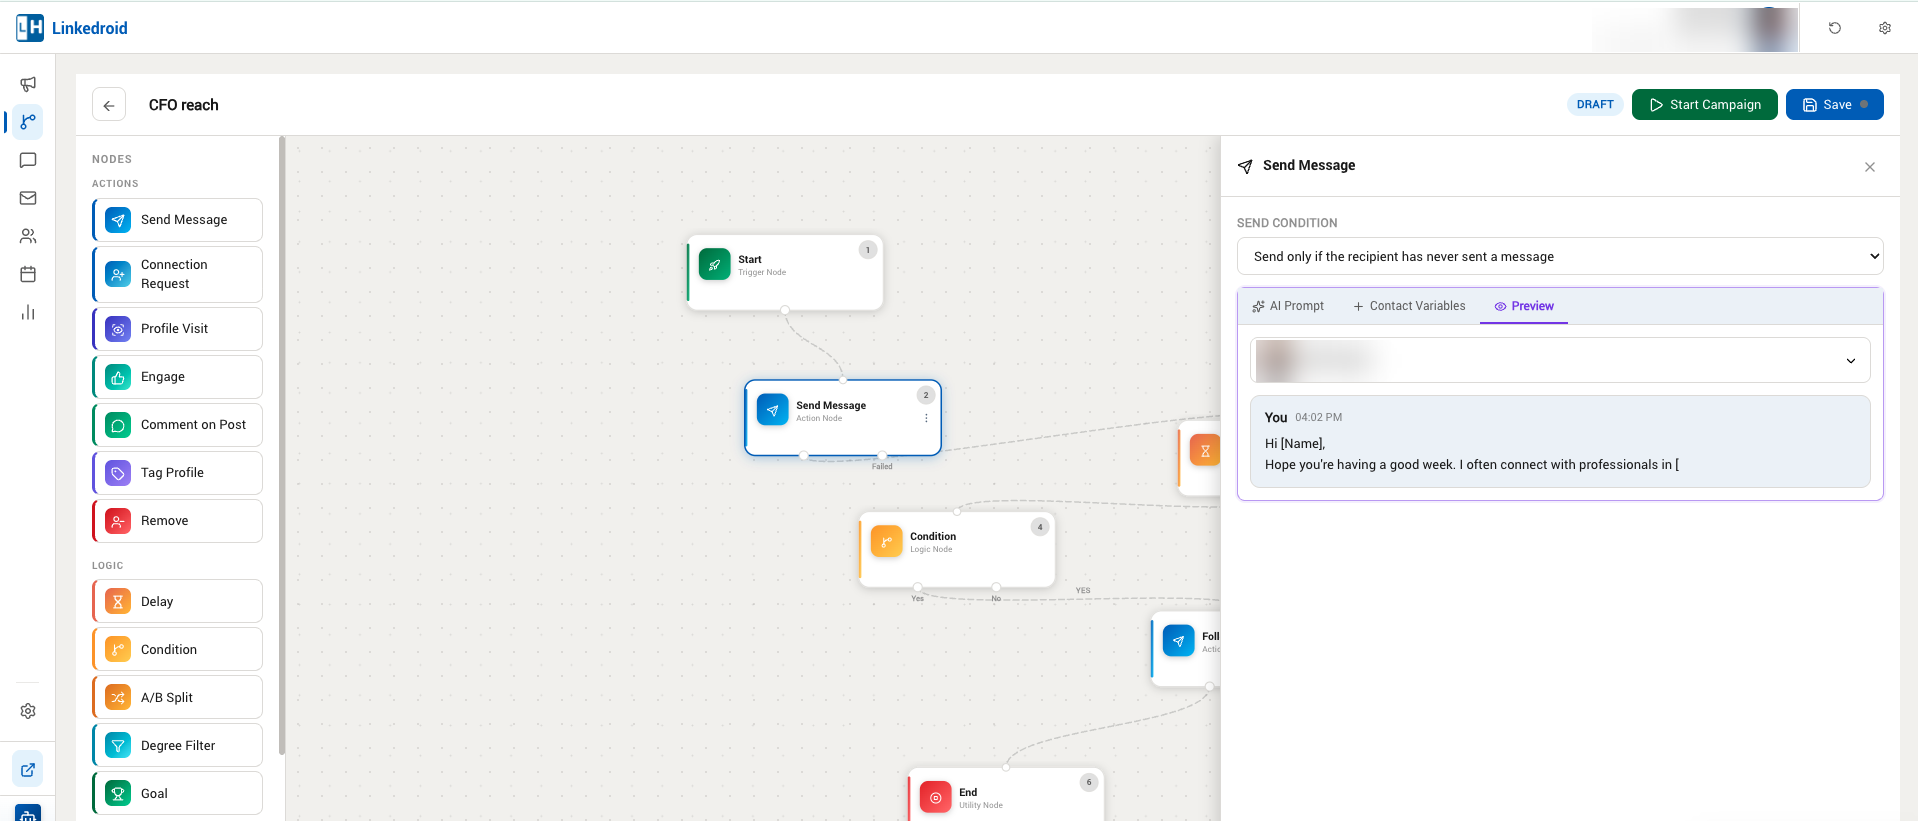
The message preview tab
Preview against a selected profile from the campaign audience. Recipient name blurred.

Use Preview before every launch. It is the cheapest check in the product and it catches the template that still says "Hi [Name]".

Configuring the Condition node

Condition is what makes the flow adaptive. It offers three triggers:

  • Prospect replied with a message
  • Prospect accepted connection
  • Headline contains keyword, with a keyword box that appears when you select it

Then a Wait before checking value in minutes, hours or days.

That wait matters more than people expect. Checking "accepted connection" after ten minutes routes almost everyone down the No branch, because nobody accepts that fast. Give it two or three days.

The node has Yes and No outputs, and both need somewhere to go. A branch that dead-ends silently drops those profiles.

A sequence that works

If you want one flow to start from, this is a reasonable shape:

  1. Start, targeting a tag.
  2. Profile Visit. A view before an invite makes the invite less cold.
  3. Delay, one day.
  4. Connection Request with an AI note.
  5. Delay, three days.
  6. Condition: prospect accepted connection.
  7. Yes branch: Send Message, condition set to "no conversation exists". Then Goal.
  8. No branch: Delay four days, then Remove.

Eight nodes. Every step has a reason, and it gives up gracefully instead of chasing people who ignored you.

Watching it run

Save, then Start Campaign. The analytics view is where you find out whether the flow works.
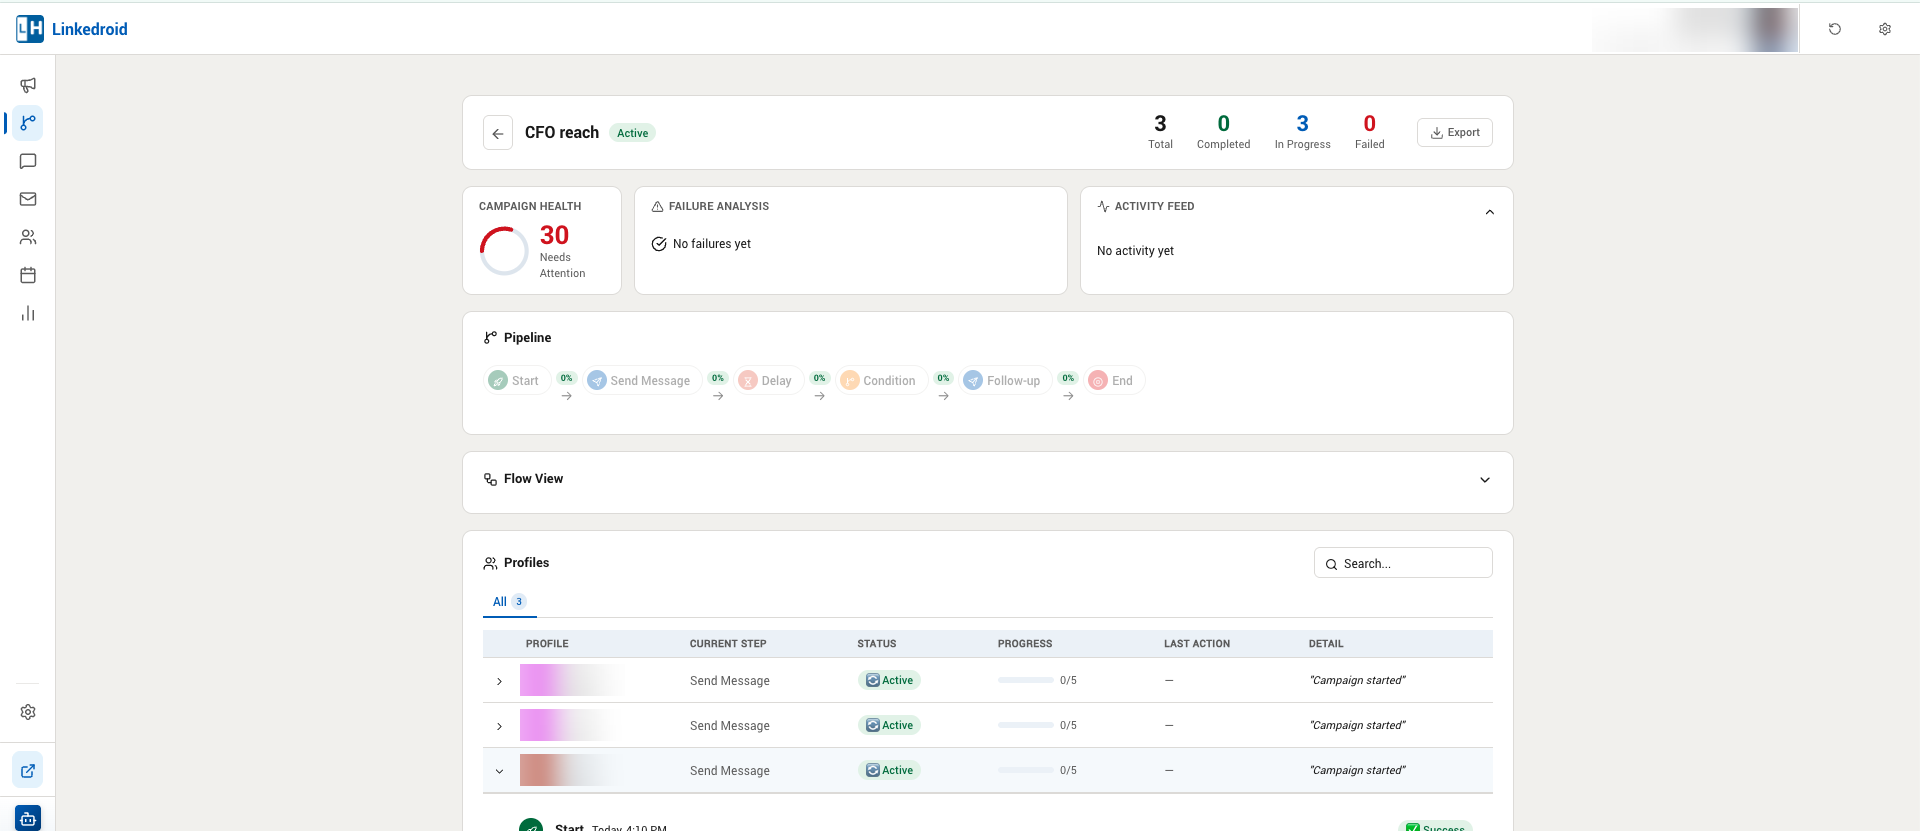
Drip campaign analytics
Totals, a campaign health score, failure analysis, activity feed, and a pipeline showing conversion between nodes.

The Pipeline is the part to read. Each node shows how many profiles reached it, the percentage that moved on, and a drop-off count in red. That tells you exactly which step is losing people, which is not something you can work out from a total.

Campaign Health is a single score with a label like Needs Attention or Moderate. Treat it as a prompt to look at the pipeline, not as a verdict.

Reading a failure

The Profiles table lists everyone in the campaign with their current step, status and last action. Expand a row and you get that profile's full timeline.
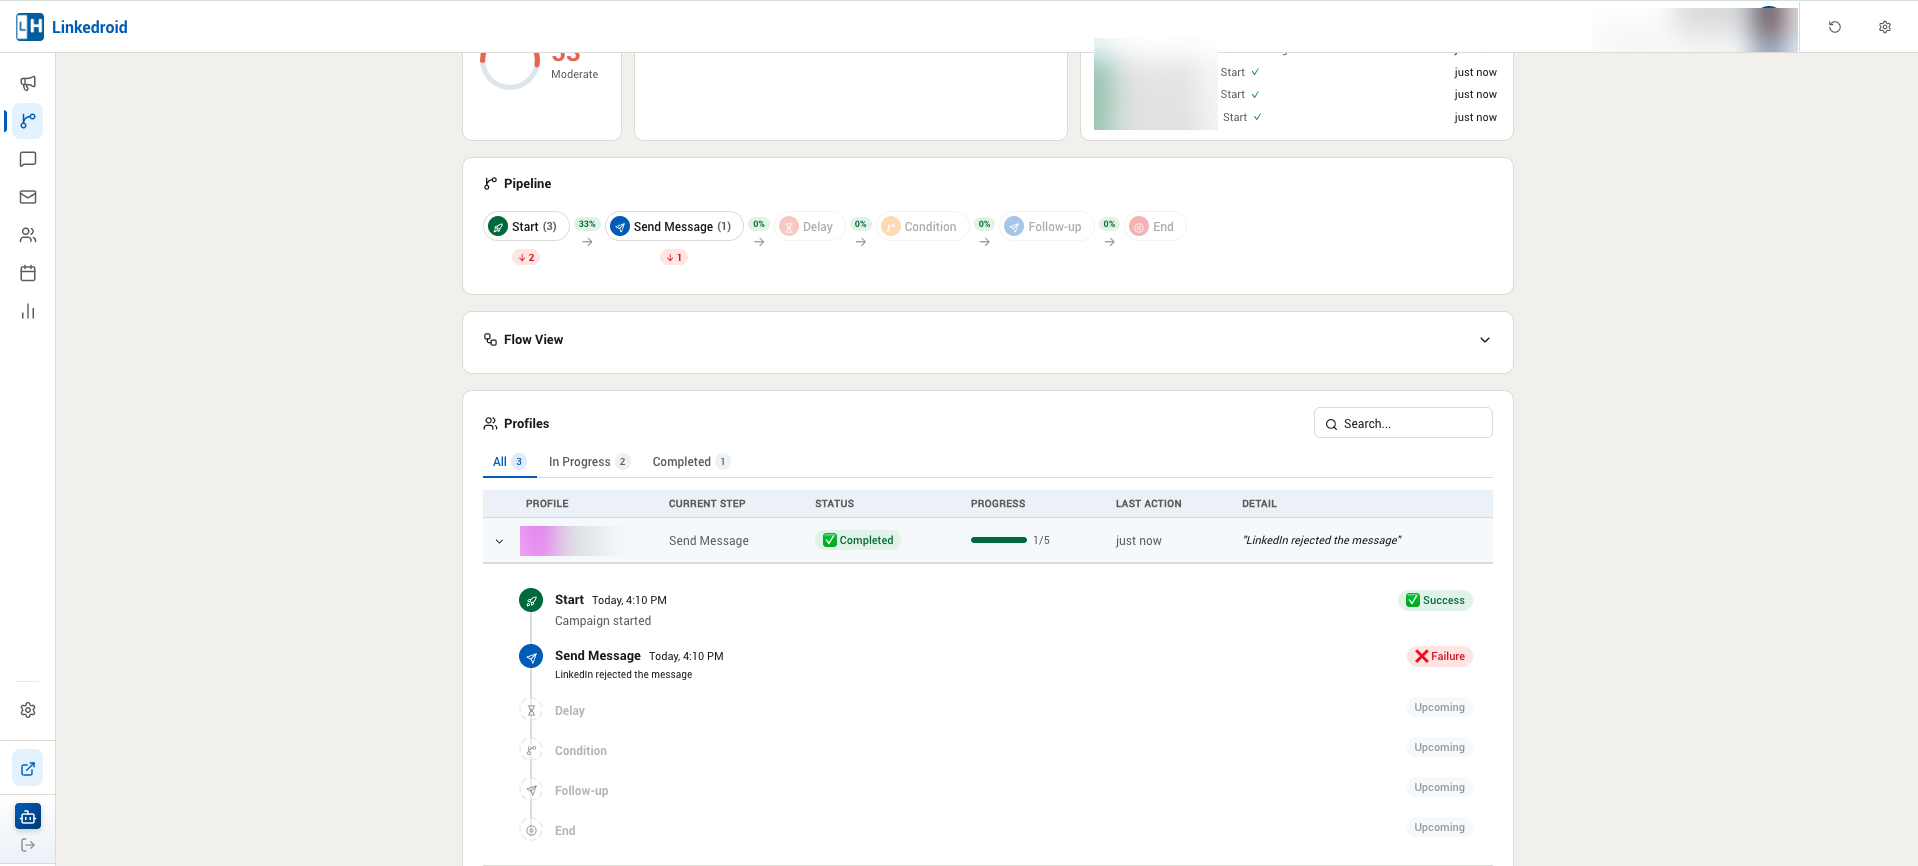
A per-profile execution timeline showing a failure
One profile's timeline: Start succeeded, Send Message failed with "LinkedIn rejected the message", and the remaining steps are marked Upcoming.

This is worth dwelling on, because it is a real failure and a common one.

"LinkedIn rejected the message" almost always means you cannot message that person. Usually they are not a 1st degree connection, and LinkedIn does not allow direct messages to people you are not connected to without InMail.

The fix is structural, not a retry. If a flow opens with Send Message, its audience has to be existing connections. If you are reaching people you are not connected to, the flow has to open with Connection Request, then a Condition checking acceptance, and only message down the Yes branch.

Check this table after the first hour of any new campaign. A flow that is going to fail for everyone fails for the first profile too, and an hour of attention saves a week of a campaign quietly doing nothing.

What to remember

  • Start from a template and cut it down.
  • Set a Send Condition on every message node so you never talk over a reply.
  • Give Condition nodes days, not minutes, to check for a response.
  • Connect both branches of every Condition.
  • Preview before launching, and read the Profiles table after.

That is the series. Getting started covers installation and the dashboard, your first search campaign covers simple outreach, AI personalization covers per-profile messages, and this one covers sequences.

Questions to help@linkedroid.com.

Comments

Popular posts from this blog

Learn all about settings available with Linkedroid

Updated for Linkedroid 3.7. This guide was originally written in 2020, when settings lived in a small popup. They now live in a full Preferences screen with four tabs, and several settings below did not exist at all back then. Settings are where you decide how hard Linkedroid pushes, when it runs, and what it says. Getting them right before your first campaign matters more than anything else you will do in the product. Opening Preferences Two ways in: the gear icon in the top right, or Settings at the bottom of the sidebar. Both open the same Preferences screen. It has four tabs: General , Automation , Schedule and Personalization . The General tab. General LinkedIn Platform selects your subscription type: Regular LinkedIn, Sales Navigator or LinkedIn Recruiter. This is not cosmetic. It changes which pages Linkedroid reads and what daily limits are available to you. Appearance sets the theme to System, Light or Dark. Backup & Restore exports everything Linke...

How to visit or add LinkedIn profiles?

Visiting profiles is as simple as clicking a button, All you need to do is set up a search, we're going to cover all about visiting a profile and also adding 2nd-degree connections while visiting. So I'm assuming you've already logged in to LinkedIn after then follow the steps below. Open Linkedroid by clicking on the Linkedroid icon present in the chrome. (The blue colour icon). If you've no Linkedin search tab open then you'll land up here.  Click on Open LinkedIn button. Once you click on this button a new tab will open with LinkedIn search tab now wait for page load. Once page load completed you can go to the LinkedIn search page and add the filters in your search (Add search filters depends on your business). After setting up filters go back to Linkedroid (by clicking Linkedroid icon or directly go to tab). Click refresh button on the right. After refreshing, you can see the same profiles are loaded in Linkedroid as on the ...

Complete guide to drip campaigns with Linkedroid

A drip campaign is well known in the marketing domain,  It is often known as autoresponders, drip marketing and marketing automation. Linkedroid has launched a new feature where you can set up a campaign using existing actions. This post will cover all about to set up and execute a drip campaign. First of all, we'll cover all the action elements available with drip campaigns. As you click on any action element. you'll get side popup to fill all the information respective to the action type. Start - This is the very first action element where you've to choose targeted prospects to send drip campaign. only one element of this kind is available for a drip campaign. Message - This action element is used to set up a message to be sent to the prospects. you can pick existing message template  from the dropdown or click on new template checkbox to write down for current campaign.  Delay - If you want to delay between two action elements then you can use ...

How to open Linkedroid CRM?

Linkeroid CRM does not open directly when you click on Linkedroid icon from the chrome bar. This post will cover two ways to open CRM. Follow these steps Right-click on the Linkedroid icon, In the dropdown you'll see an option Linkdroid CRM.  Once you click on the Linkedroid CRM. It'll navigate you to Linkedroid CRM. There is one more way to open Linkedroid CRM. Go to linkedroid, load profile and everything you'll see CRM button on the left sidebar. Refer the image below and check red marked button. Finally, you've learned how to open CRM.  if you're still not clear or have any doubts. please comment below or reach out to us at  help@linkedroid.com

Integrate twitter with linkedroid to automate your daily activities

Fasten your seat belts, you're going to learn to automate your twitter activities with Linkedroid, Make your presence out of the LinkedIn network, meet and greet your prospects on twitter too. This post helps you understand all about twitter integration. How twitter integration helps you? List down all verified accounts of LinkedIn available on twitter. Automate Follow/Unfollow prospects on twitter. Create a list in your twitter account from Linkedin itself. Automate adding twitter accounts to your targeted list. If this really excites you then follow steps for twitter integration. Click on the twitter button on the right side of the panel. Once you see the popup, click on the Connect Twitter button. Now it will redirect you to twitter page. just authorise to login then you can see your twitter handled found from LinkedIn visit campaign. Click on Add all to list to add all below listed down prospects to list selected in the dropdown (as selected ma...

Tagging connections using Linkedroid CRM

Tagging connection is the very initial stage for any campaign in linkedroid. If you don't have tagged profiles in your account you can't send any campaign so let's see how easy it is. This post will cover all about tagging profiles and managing tags like updating, creating, deleting tags from profiles. Follow the steps to tag profiles. Go to CRM (if you don't know how to open CRM check this post ). Click on the connection in the right sidebar and then click my connections. Now choose profiles you want to tag by clicking on the left side of the profile. After choosing profile you can click on the button below Tag Selected Profile then you can see a popup asking for tag names. Insert tag name and hit enter to add tag name, once you're done adding tag names click on button Tag Profiles . That's it you've successfully tagged the selected profiles. To edit any tags of any profile, click on the edit icon next to the tag name in th...

Bulk auto Withdraw/Accept pending invitations

This feature is very much helpful and important because if our queue of outstanding invitations increases and reaches to a threshold then LinkedIn put restrictions on invites we can send but don't need to worry about we've added a great feature like this to auto clear our queue on just a button click. This post will cover all about Invitation Manager  section available on the right sidebar of the page. Note - The  Invitation Manager  section is only available when we've selected regular Linkedin platform. Due to some restriction, Linkedroid doesn't allow this feature to use with Sales Navigator (Switch to regular if we want to use this feature, view this post to switch platform ). Invitation Manager Let talk about one by one for each button.  SENT - This shows all the pending/outstanding invitations sent to prospects along with the time it was sent. if we click on withdraw next to the profile then this request will be cancelled.  We've the...

How to switch to sales navigator?

Switching to the sales navigator platform. If you're still struggling to switch into your sales navigator platform then don't worry this post will help you switch your platform. Follow the below steps. Open Linkedroid by clicking on the Linkedroid icon present in the chrome. (The blue colour icon). Now click on the Gear Icon on the top right corner. (Assuming you're already signed into linkedroid and see this on the right side) Now choose the very first option, LinkedIn platform and select sales navigator ( the   option will be disabled if you've not subscribed to sales navigator ) . Now we're good to go, click on the refresh button.    If you're still unable to switch to sales navigator then please reach out to us at  help@linkedroid.com

Export your data to google drive and open in google spreadsheets

Export to google , If you're not using this feature. you're missing the beauty of Linkedroid to keep your data safe and secure in the google cloud 😃 Yes true, we don't know when you run out of memory or your system crashes or you clears chrome cache by mistake or something. In that case, you'll lose all your visit data. which means all the profiles you've visited in a month, a year or so will go away. Keeping all these things in mind we've developed this feature to keep your data safe and secure. Not just security it's easy to share, collaborate between your colleagues or anyone you wish so this post will help you understand how it can be setup. This feature is to upload your Previous Sessions  to google drive and open them in google spreadsheets. This section is present on the left sidebar of the Linkedroid. The list item is created when we visit profiles. Previous Sessions (1.1) Follow steps to export your session data to google drive. ...

How to fix not loading same profiles as on the search page?

Help with active bug #1 We've been recorded requests from a few users that they are not seeing the same profiles as on the search page. The problem has been identified and it has a quick fix. Follow the steps and check if you're performing the same. The issue is with the users using the sales navigator. 1. Make sure currently only 1 tab is opened with the sales search URL. 2. Check if you're loading a saved search URL.  Look at the URL it contains  savedSearchId which means it is a saved search. https://www.linkedin.com/sales/search/people?savedSearchId=637935216&searchSessionId=bbwvaidcQiqpNOc3RggzGA%3D%3D 2.1   Go to the sales search tab, Pick any filter from the filter list.  Refer below, I've added a new filter as geography (United States). 3. Now go back to Linkedroid and click the refresh button .  4. That's it, now you should see updated profiles. If the problem persists, please reach out ...